
(PHP8.1対応)【CentOS8】phpMyAdminインストール手順(nginx+php+MySQL)での設定
こんにちは!インフラ関連のシステムエンジニアをやっているカユラ(@kayura_SE)です。
本記事では、CentOS8環境でPHP8.1対応のphpMyAdminをnginx+php+MySQLの構成でインストール・設定する手順を解説します。PHP8系への移行は前提パッケージエラーが多く躓きやすいため、上から順番に実施することでphpMyAdminにログインできる構成になっています。「root」ユーザーで作業しているため、必要に応じて「sudo」をつけてください。
| 名称 | バージョン |
|---|---|
| OS | CentOS8.7 / AlmaLinux8.7 / RHEL8.7 |
| PHP | 8.1.18-1.el8.remi |
| PHP-FPM | 8.1.18-1.el8.remi |
| phpMyAdmin | 5.2.1-1.el8.remi |
| nginx | 1:1.14.1-9.module_el8.3.0+2165+af250afe |
| MySQL | 8.0.30 |
(PHP7系と共通)必要なパッケージのインストール
① nginx をインストールする
yum install -y nginx
② remiリポジトリをインストールする
このリポジトリが無いとインストールに失敗します。PHP系の最新パッケージを入手できるリポジトリです。以下のサイトでバージョンを選択できますが、Ver9はOSを9系にする必要があります。
http://rpms.remirepo.net/enterprise/
yum install -y http://rpms.remirepo.net/enterprise/remi-release-8.rpm
③ remiリポジトリを無効化する
利用するときだけ明示的に指定するため、yum と dnf の両方で無効化しておきます。
dnf config-manager --disable remi-modular remi-safe
yum config-manager --disable remi-modular remi-safe
④ MySQL をインストールする
最新バージョンを確認してからインストールします。
yum info mysql
yum install -y @mysql:8.0
(PHP8系)必要なパッケージのインストール
※順番が重要です。上から順に実施してください。
① PHPリポジトリの状況を確認する
以下のコマンドで現在利用可能なPHPのバージョンを確認します。標準リポジトリの「PHP7.2」を「remi-8.1」に変更していきます。
dnf module list php --enablerepo=remi-modular
AlmaLinux 8 - AppStream
Name    Stream           Profiles                        Summary
php     7.2 [d][e]       common [d], devel, minimal      PHP scripting language
php     7.3              common [d], devel, minimal      PHP scripting language
php     7.4              common [d], devel, minimal      PHP scripting language
php     8.0              common [d], devel, minimal      PHP scripting language

Remi's Modular repository for Enterprise Linux 8 - x86_64
Name    Stream           Profiles                        Summary
php     remi-7.2         common [d], devel, minimal      PHP scripting language
php     remi-7.3         common [d], devel, minimal      PHP scripting language
php     remi-7.4         common [d], devel, minimal      PHP scripting language
php     remi-8.0         common [d], devel, minimal      PHP scripting language
php     remi-8.1         common [d], devel, minimal      PHP scripting language
php     remi-8.2         common [d], devel, minimal      PHP scripting language

ヒント: [d]efault, [e]nabled, [x]disabled, [i]nstalled
② PHPリポジトリの設定をリセットする
dnf module reset php
③ PHP8.1リポジトリを有効化し、設定を確認する
dnf module enable php:remi-8.1 --enablerepo=remi-modular
dnf module list php --enablerepo=remi-modular
標準リポジトリの「PHP7.2」の enable が無くなり、remi-8.1 に [e] が付与されていることを確認します。
Remi's Modular repository for Enterprise Linux 8 - x86_64
Name    Stream           Profiles                        Summary
php     remi-7.2         common [d], devel, minimal      PHP scripting language
php     remi-7.3         common [d], devel, minimal      PHP scripting language
php     remi-7.4         common [d], devel, minimal      PHP scripting language
php     remi-8.0         common [d], devel, minimal      PHP scripting language
php     remi-8.1 [e]     common [d], devel, minimal      PHP scripting language
php     remi-8.2         common [d], devel, minimal      PHP scripting language

ヒント: [d]efault, [e]nabled, [x]disabled, [i]nstalled
④ oniguruma5php をインストールする
入れておかないと後工程で前提パッケージエラーが発生します。「remi」リポジトリからインストールします。
yum install --enablerepo=remi oniguruma5php -y
⑤ libicu71 をインストールする
入れておかないと後工程で前提パッケージエラーが発生します。「remi」リポジトリからインストールします。
yum install --enablerepo=remi libicu71 -y
⑥ php-mbstring・php-intl・php・php-mysqlnd をインストールする
php-fpm は依存関係で自動的にインストールされます。「remi-modular」リポジトリからインストールします。
yum install --enablerepo=remi-modular php-mbstring php-intl php php-mysqlnd -y
⑦ php-posix をインストールする
yum install --enablerepo=remi-modular php-posix -y
⑧ php-zip をインストールする
dnf install --enablerepo=remi-modular php-zip -y
⑨ libraqm をインストールする
yum install --enablerepo=epel libraqm -y
⑩ libimagequant をインストールする
yum install --enablerepo=remi libimagequant -y
⑪ libavif をインストールする
yum install --enablerepo=epel libavif -y
⑫ gd3php をインストールする
yum install --enablerepo=remi gd3php -y
⑬ php-gd をインストールする
yum install --enablerepo=remi-modular php-gd -y
⑭ phpMyAdmin をインストールする
いよいよ本題のphpMyAdminのインストールです。「remi」リポジトリからインストールします。
yum install --enablerepo=remi phpMyAdmin -y
サービスの起動&自動起動設定
systemctl start nginx
systemctl enable nginx

systemctl start php-fpm
systemctl enable php-fpm

systemctl start mysqld
systemctl enable mysqld
Configファイルの設定
php-fpm の設定(/etc/php-fpm.d/www.conf)
デフォルトの実行ユーザーとグループが「apache」になっているため「nginx」に変更します。
■変更前
listen = ''
user = apache
group = apache

■変更後
listen = /var/run/php-fpm/php-fpm.sock
user = nginx
group = nginx
php の設定(/etc/php.ini)
PHPセッションの保存先を「/tmp」から「/var/lib/php/session」に変更します。
■変更前
;session.save_path = "/tmp"

■変更後
session.save_path = "/var/lib/php/session"
nginx の設定(/etc/nginx/conf.d/phpmyadmin.conf)
新規にファイルを作成します。「192.168.1.180」の部分はサーバー自身のIPアドレスまたはFQDNに変更してください。
Configファイルの権限変更
nginxが「/var/lib/php/session」にアクセスできるように権限を変更します。
chown -R root.nginx /var/lib/php/session
サービスの再起動
systemctl restart nginx
systemctl restart php-fpm
systemctl restart mysqld
MySQLの初期設定とユーザー作成
① 初期設定コマンドを実行する
mysql_secure_installation
Press y|Y for Yes, any other key for No: y
Please enter 0 = LOW, 1 = MEDIUM and 2 = STRONG: 0
New password: (rootユーザーのパスワードを入力)
Re-enter new password: (rootユーザーのパスワードを再入力)
Do you wish to continue with the password provided? : y
Remove anonymous users? : y
Disallow root login remotely? : y
Remove test database and access to it? : y
Reload privilege tables now? : y
② root ユーザーで MySQL にログインする
mysql -u root -p
Enter password: (rootユーザーに設定したパスワード)
③ 全権限のあるユーザーを作成する
黄色の部分は任意の値を設定してください。
mysql> CREATE USER 'ユーザー名'@'localhost' IDENTIFIED BY 'パスワード';
mysql> GRANT ALL ON *.* TO 'ユーザー名'@'localhost' WITH GRANT OPTION;
mysql> FLUSH PRIVILEGES;
mysql> exit
④ 作成したユーザーでログインできることを確認する
mysql -u ユーザー名 -p
Enter password: (全権限のあるユーザーのパスワード)
phpMyAdmin へのログイン
「192.168.1.180」の部分はサーバー自身のIPアドレスまたはFQDNに変更してください。
Webブラウザで以下のURLにアクセスします。
http://192.168.1.180/index.php
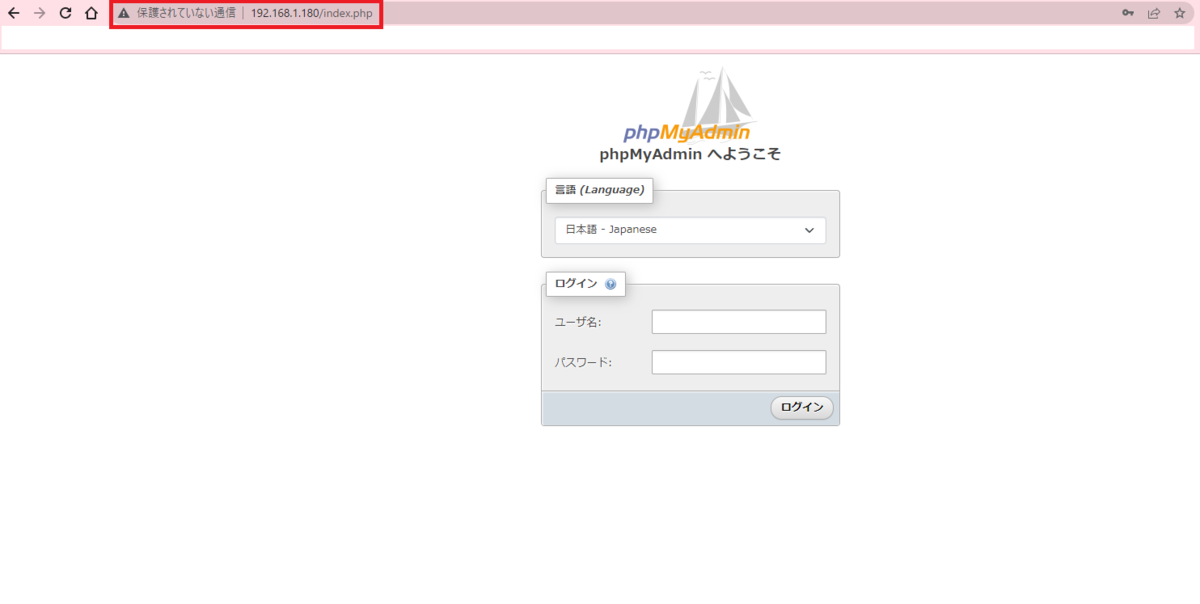
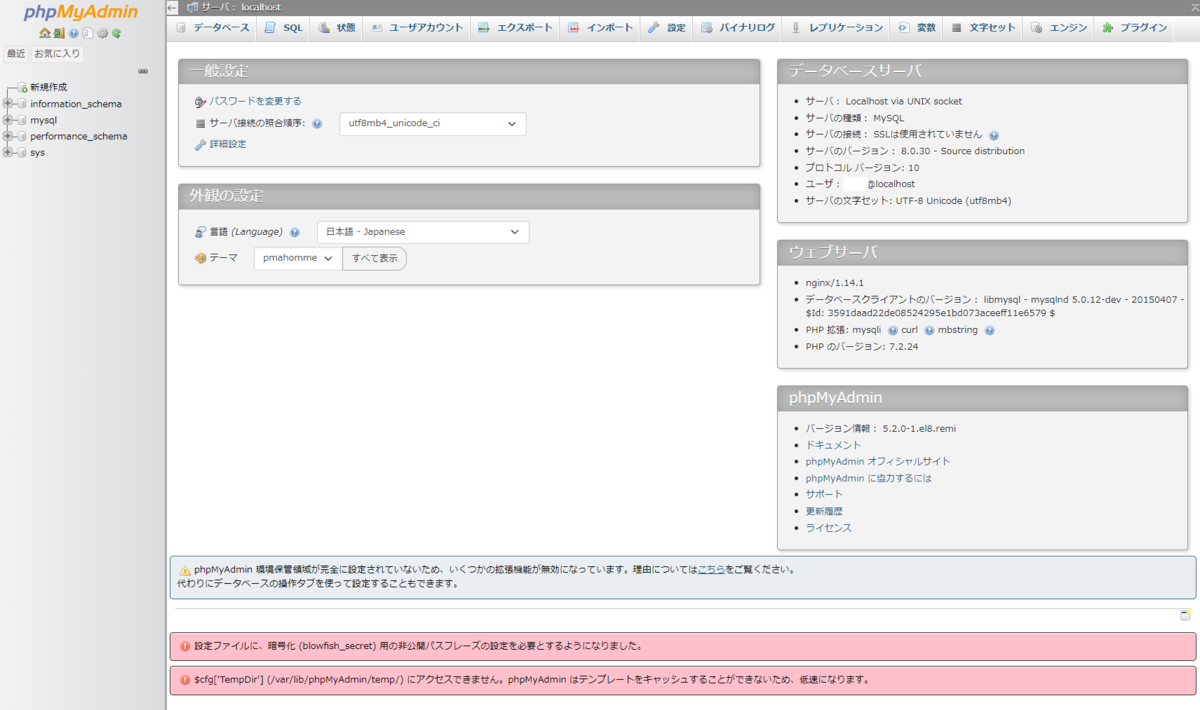
作成したMySQLのユーザー名とパスワードを入力してログインします。
phpMyAdmin を HTTPS 化する
phpMyAdminをHTTPS化する手順は以下の記事にまとめています。

まとめ
本記事ではCentOS8環境でPHP8.1対応のphpMyAdminをnginx+php+MySQLの構成でインストール・設定する手順を解説しました。PHP8系への移行は前提パッケージエラーが多いため、本記事の手順通りに実施することでスムーズにインストールできます。同様の問題で困っている方はTwitterでご連絡ください。
カユラ(@kayura_SE)
コメント